This is the next lesson in your course on Process Automation, showing you how to make your service business more efficient and predictable using ProcessKit.
In the last lesson, we created two projects, each to manage the onboarding of a new client. Over time, you'll have many more new clients to onboard, so you'll create many more projects just like these.
But you'll have other types of projects too. Like each deliverable for a client, or each blog post, each podcast episode, each sales proposal. These types of projects happen repeatedly too, so they should also follow their own standard processes.
So how can we organize all these different types of projects, so that they're not all mixed together in the same place?
And how can we make sure that the correct process gets used on each project? For example, you wouldn't want to use your Client Onboarding process when the project calls for your blog post publishing process, right?
This is where Boards come in.
In this lesson, I'll show you:
- What exactly is a Board?
- Which boards should you create for your business (and how many do you need)?
- How to create and customize a board in ProcessKit
- How to automatically load in the right process(s) for each board
- How to organize all the projects inside of a board
- Bonus: Store key information using custom fields
What is a board?
Boards in ProcessKit are spaces were you can manage all of the projects that share a common type.
For example, you might have a "Sales Proposals" board where you're keeping track of all of your sales proposals that are currently out to prospects. Each project within your Sales Proposals board would be known as a "Proposal".
You might also have a "New Client Onboarding" board. This is where you'd manage all of the onboardings of new clients-just like the two projects we've created so far.
Each board contains many projects, all sharing the same type. A project can only belong inside one board at a time. But you can easily move a project from one board to another.
For example, a project might start out as a Sales Proposal, but later when you win this contract, that project could be moved into your New Client Onboarding board, where it will continue on as an onboarding project.
Which boards should you create for your business?
Now you don't need to create too many different boards.
When you're just getting started, one or maybe just two boards could be all you need to make your business a lot more organized.
Another good rule of thumb when you're just getting started is to think about your processes and your boards in pairs:
If you have a "New Client Onboarding" process, then you should have a "New Client Onboarding" board—and we're going to create that board in just a moment. If you have a "Sales Proposal Process", then you should have a "Sales Proposals" board. If you have a "Blog Post Publishing Process", then you should have a "Blog Posts" board.
Now later on, as you build out more processes, you probably won't need to have a separate board paired with every process. And you'll be able to use multiple processes on the same projects in the same board.
But early on, when you're setting up your operation, it's helpful to follow this simple workflow:
- First, create a process
- Then create a board where all of the projects that will use that process should live.
How to create and customize a board in ProcessKit
OK, let's actually put boards to use in ProcessKit.
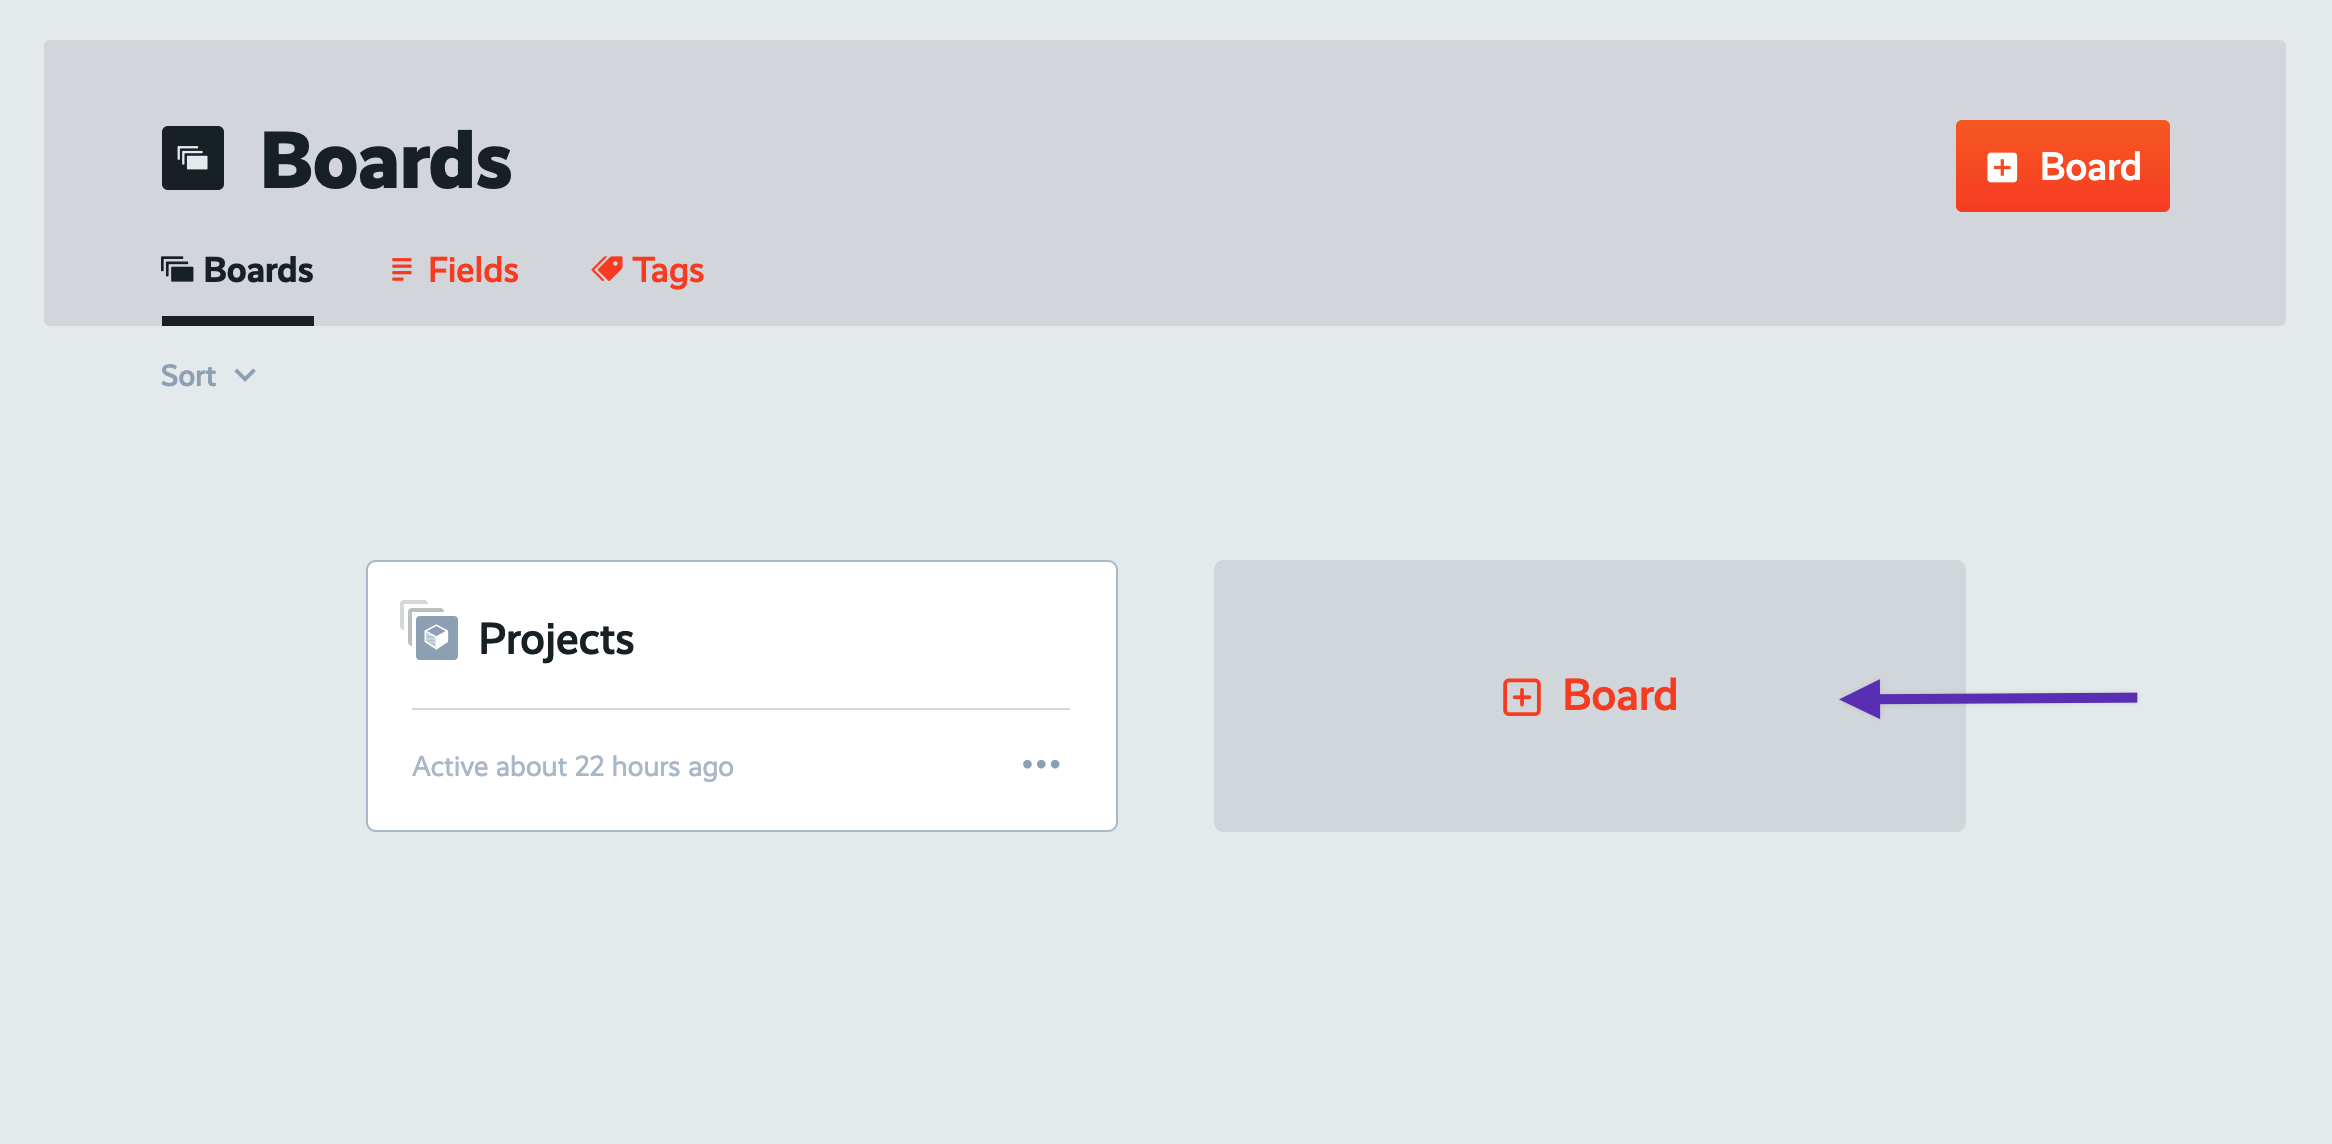
Out of the box, ProcessKit gave you one, generic, board called "Projects". That's where we created our first two projects: "Onboarding of Dunder Mifflin" and the "Onboarding of Sterling Cooper".
Now since we've created a process for "New Client Onboarding", we really should have a dedicated board where we're managing all of our new client onboardings. So lets create that now.
Click the "+ Board" button.
Title this board "New Client Onboarding" (without the quotes).
Then set the single item label to "onboarding" (without the quotes).
Note: This board's name is a little unusual… But generally, you'll want to make the board title plural and the single item label singular. For example in your "Blog Posts" board, a single project would be referred to as a "post". In your "Sales Proposals" board, a single project could be referred to as a "proposal".
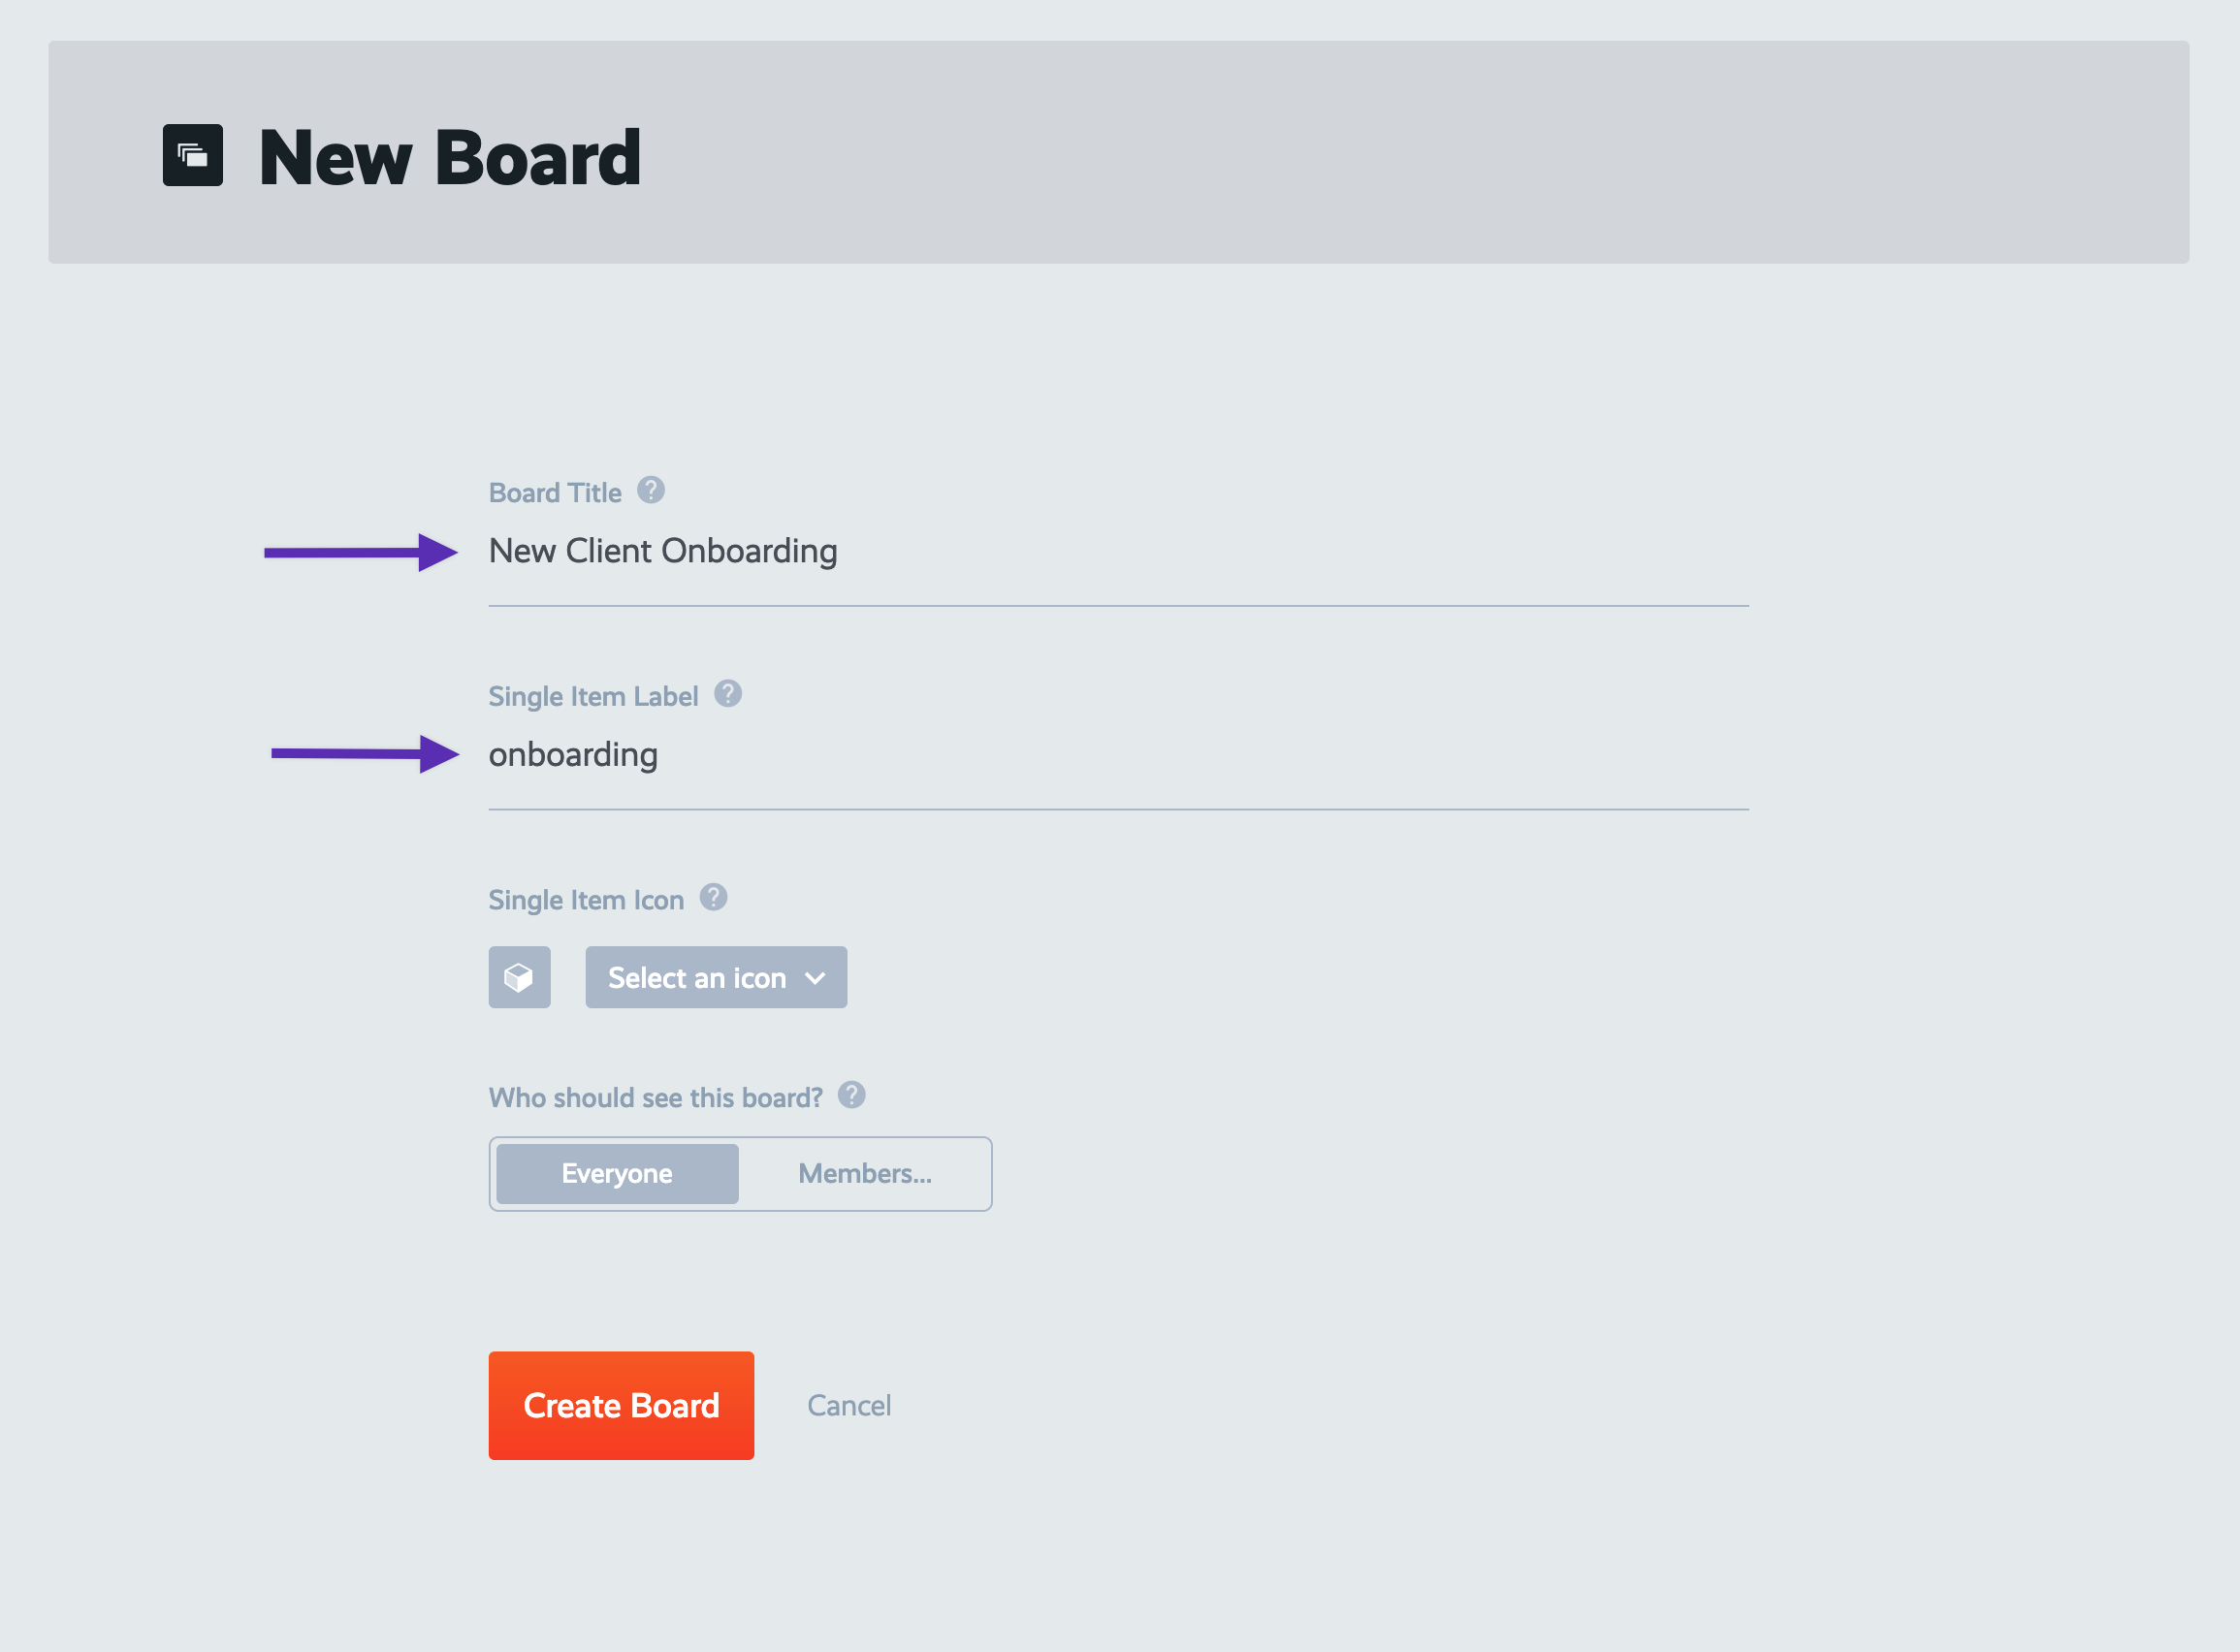
Next, let's customize our board by assigning it a unique icon. This will help make it easier to visually distinguish this board and the projects within it, from other projects in other boards.
Let's go with the rocket icon to represent our new client onboardings.
Leave this board's permissions set to "Everyone". Then go ahead and click "Create Board" to save it.
How to automatically load in the right process(s) for each board
Since our "New Client Onboarding" board is where all of our new client onboarding projects happen, and since all of those projects are going to need to follow our "New Client Onboarding" process, we should automate that, shouldn't we?
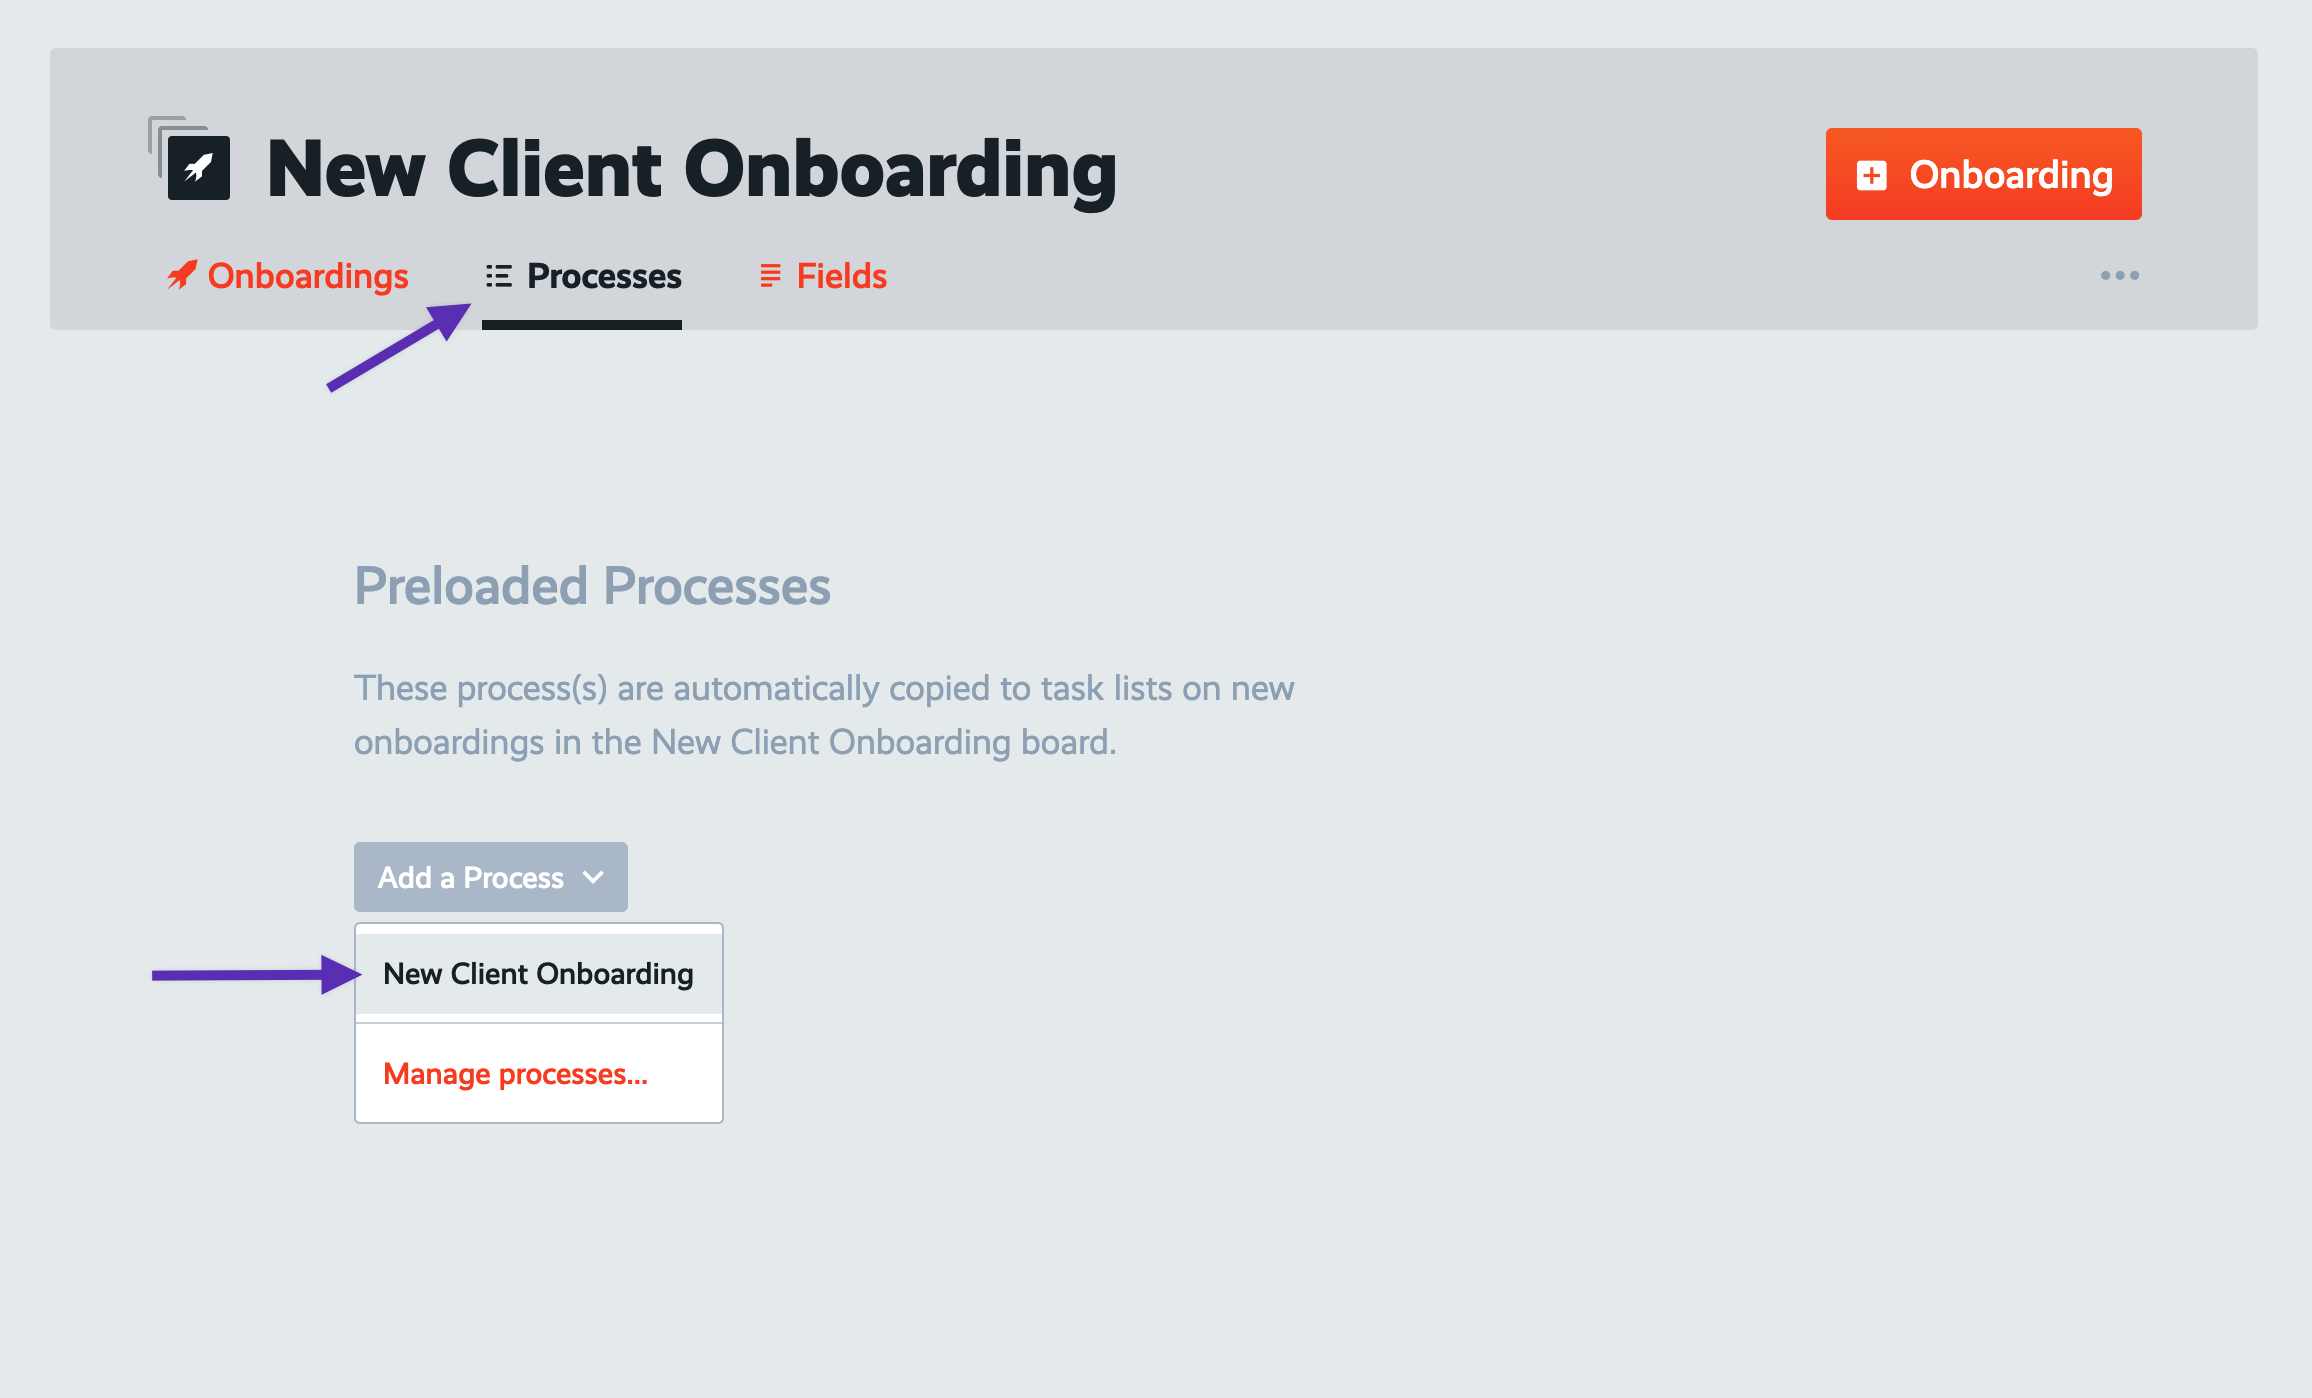
Now that we're inside our "New Client Onboarding" board, go to the "Processes" tab. Then select our "New Client Onboarding" process and add it as a preloaded process on this board. This means that every new project we create inside this board, will be pre-populated with a task list built as a copy of our "New Client Onboarding" process.
Now let's see this in action.
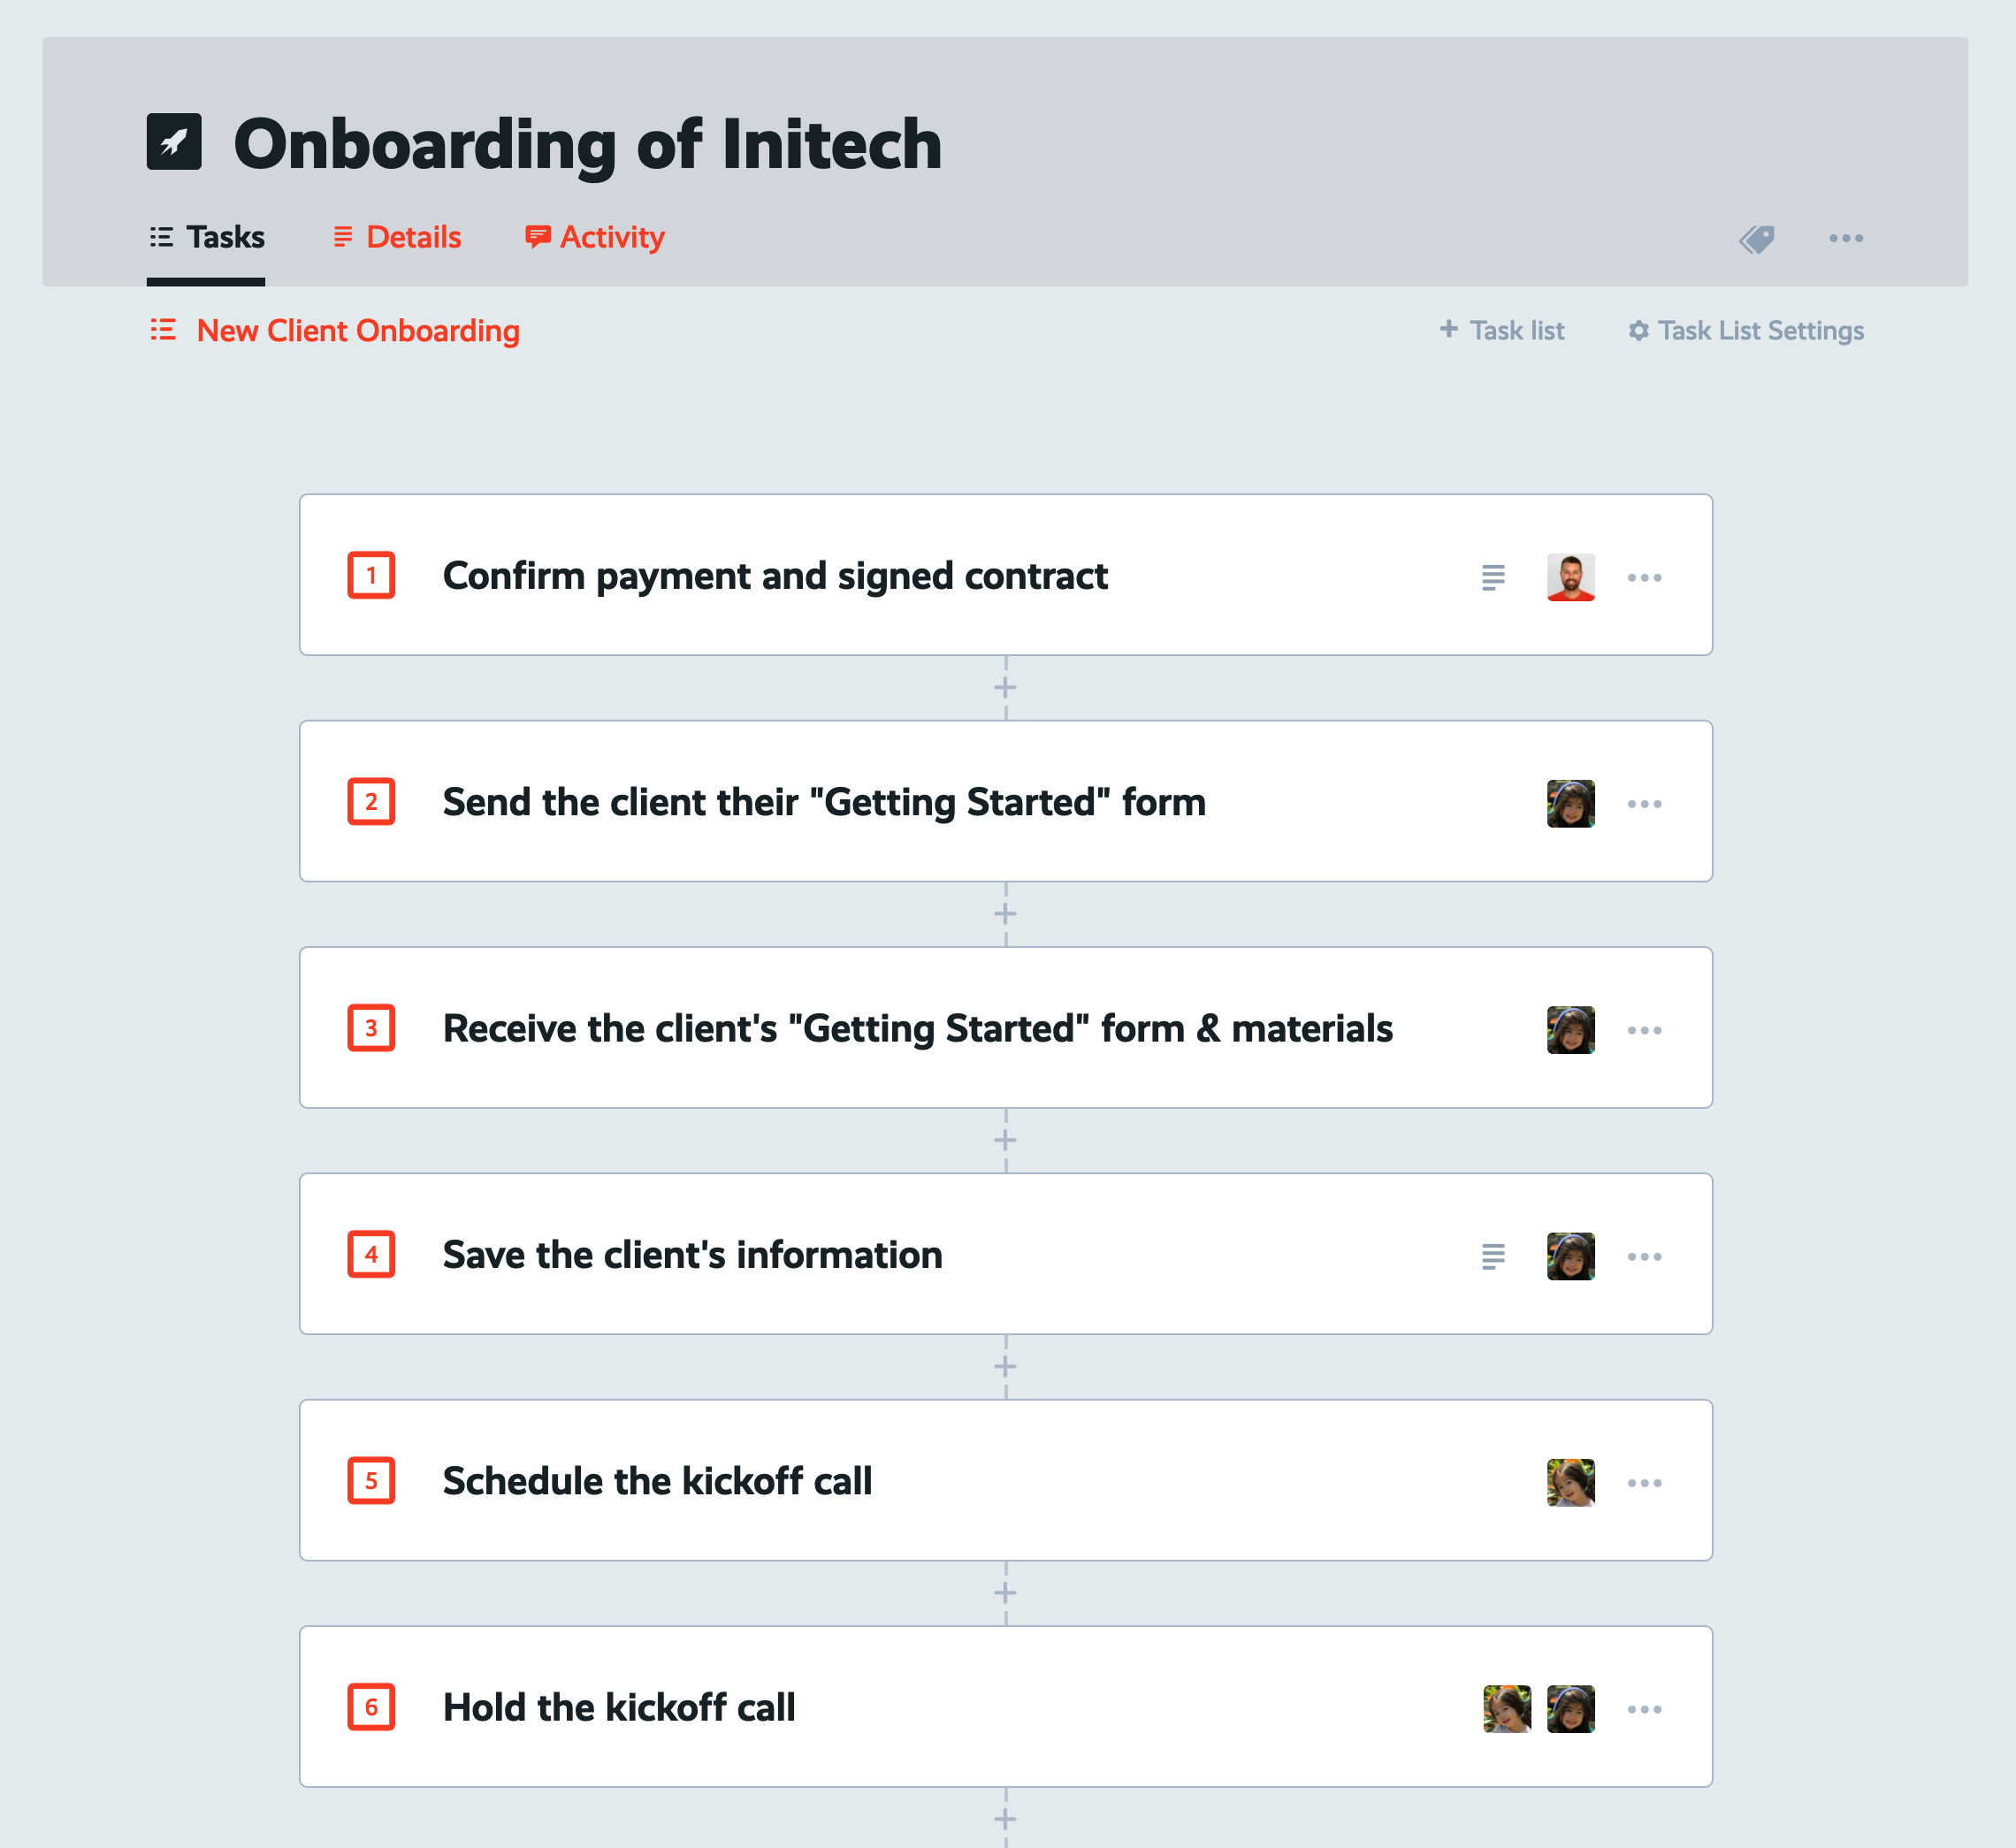
Let's create a new project. By the way, here in the "New Client Onboarding" board, projects are referred to as "onboardings". So let's create a new "onboarding" project, and call it "Onboarding of Initech".

And just like that, this new project has been automatically pre-populated with the tasks that my team will need to follow as they onboard our newest client, Initech.
Move projects into a board
Now, remember those first two projects we had created over in our "Projects" board? Those belong in our newly created "New Client Onboarding" board, don't they?
Let's move those over now.
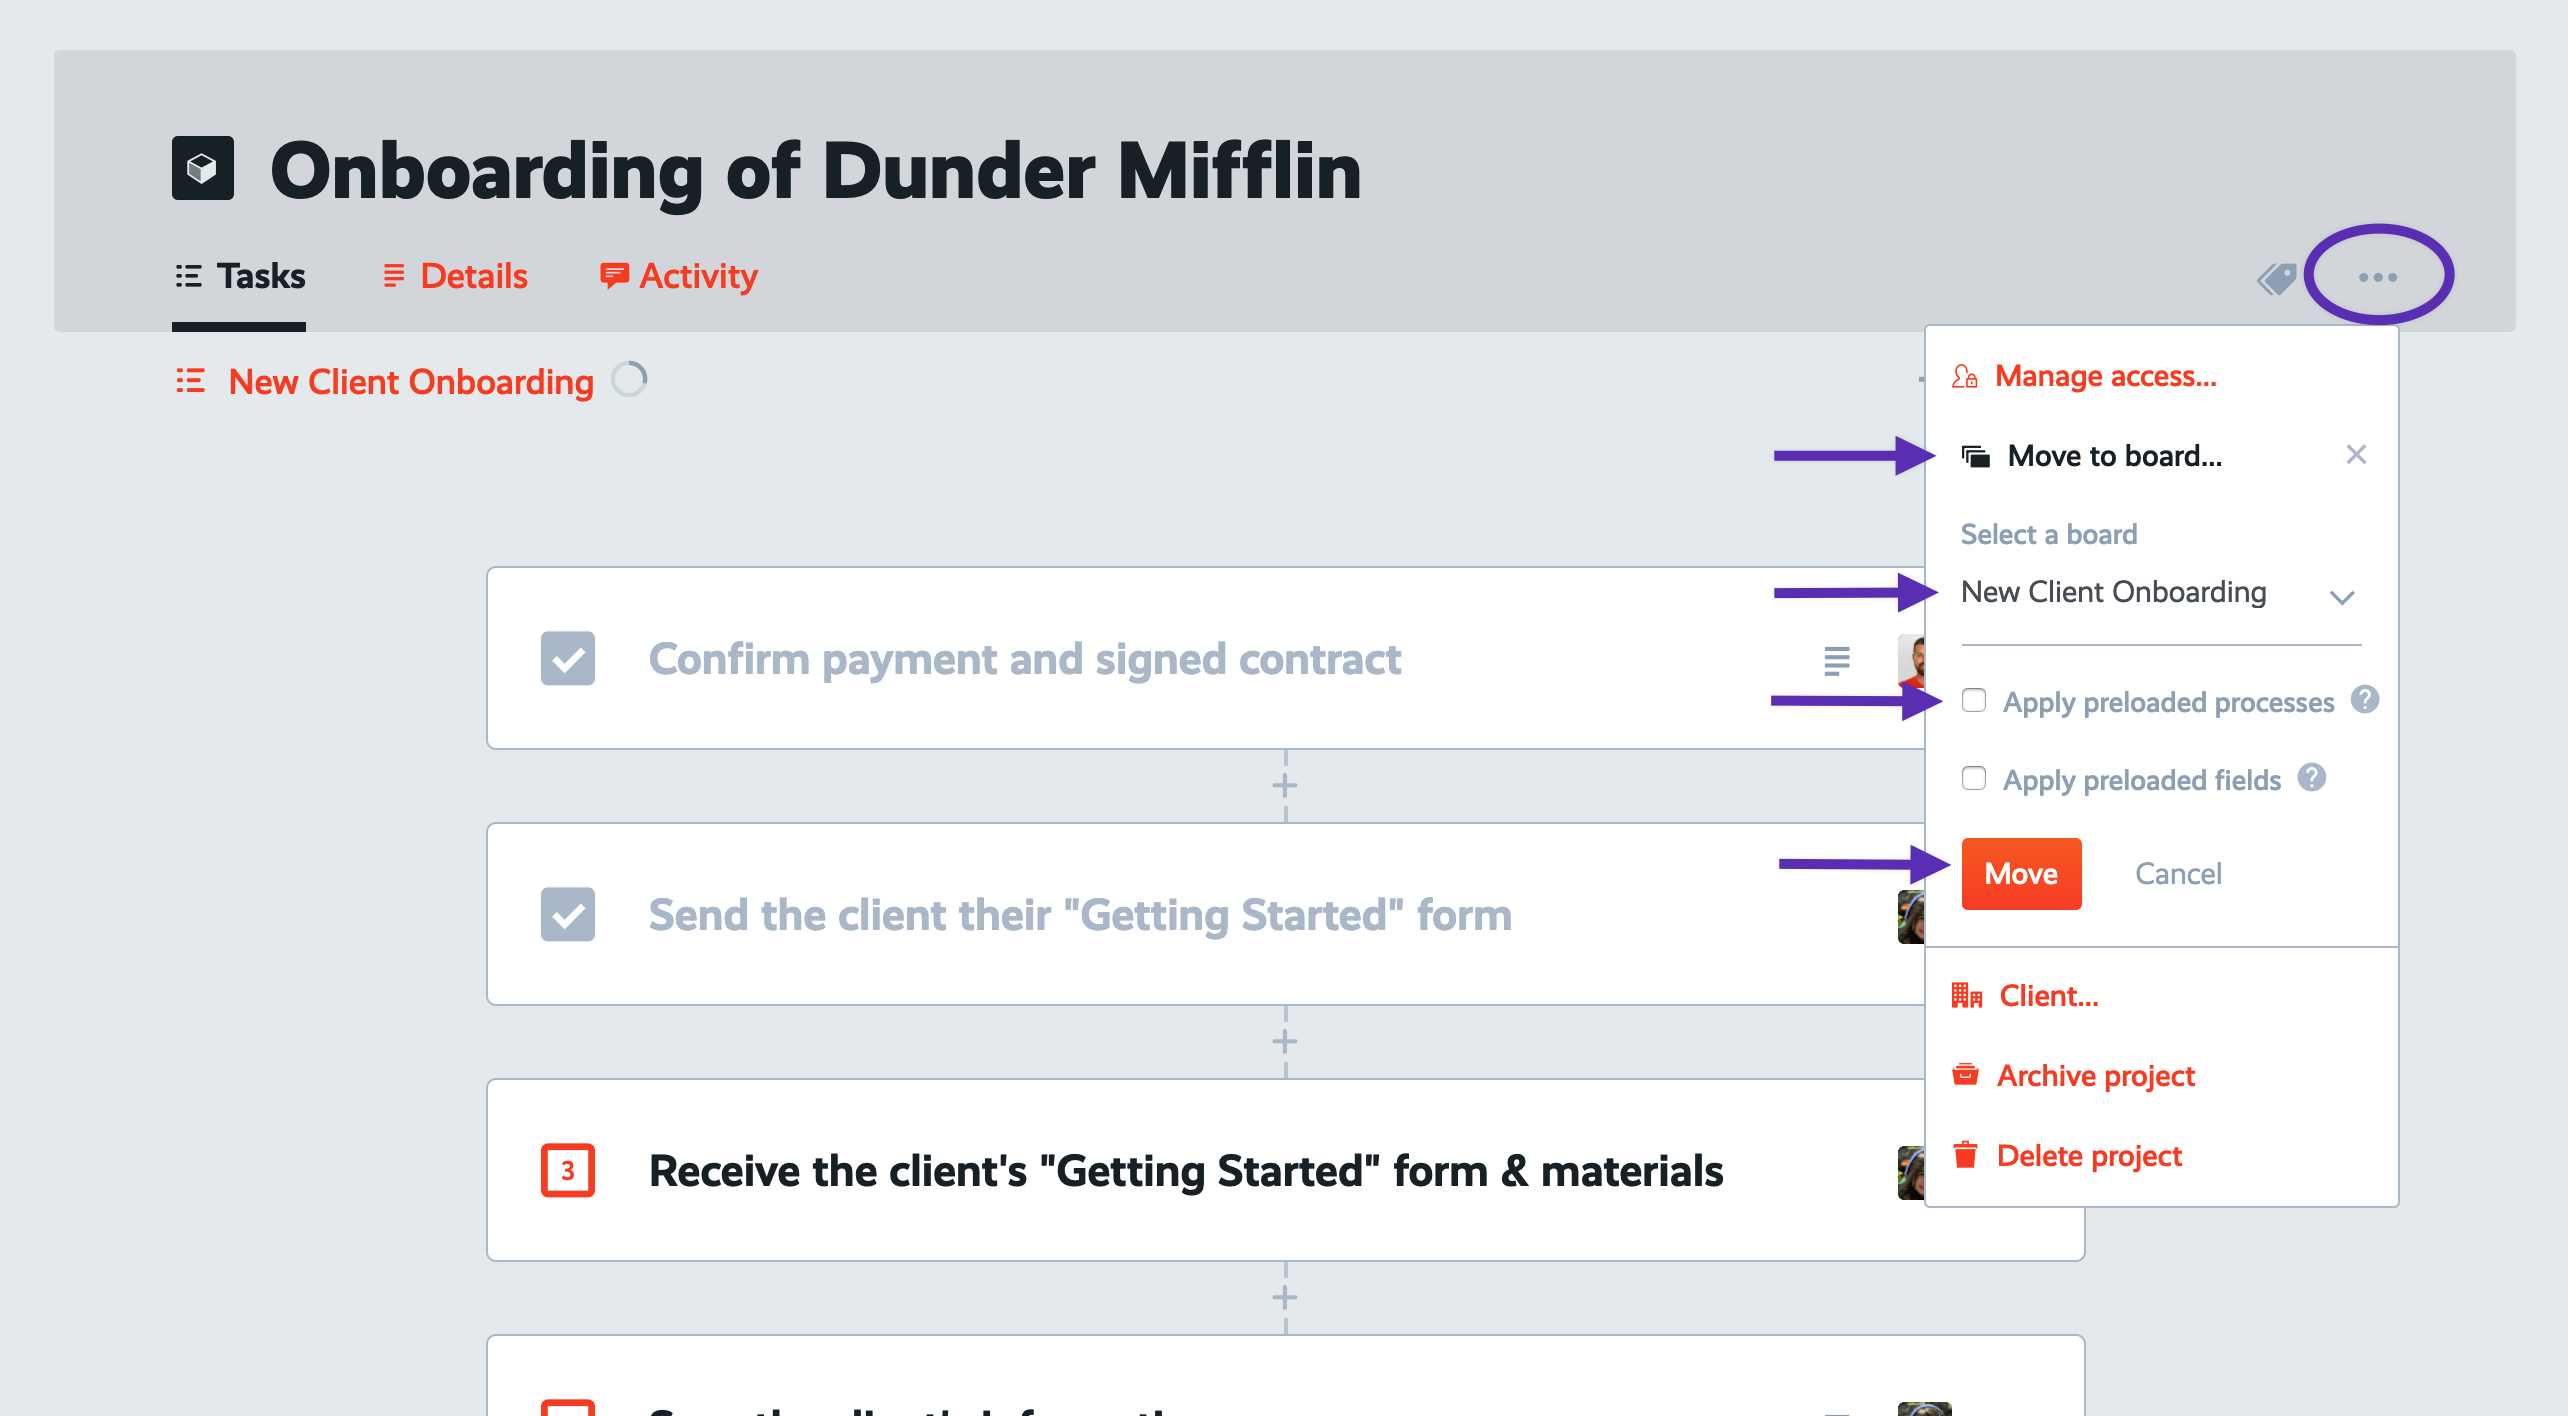
Back out to "Boards", then go back into your "Projects" board, then into that first project, "Onboarding of Dunder Mifflin".
Open this project's settings dropdown, then click "Move to board…". Select board to move to, in this case we're moving it to the "New Client Onboarding" board.
You'll want to uncheck the box for "Apply preloaded processes". If that was checked, then when moved, it would automatically apply the pre-loaded process (our "New Client Onboarding" process) in the destination board. But since we've already manually used that process to create this project's tasks, we don't want to add a duplicate task list when we perform the move.
Repeat this same “Move” on the 2nd project we had created, "Onboarding of Sterling Cooper". You should end up with all 3 projects residing inside the "New Client Onboarding" board.
How to organize all the projects within a board
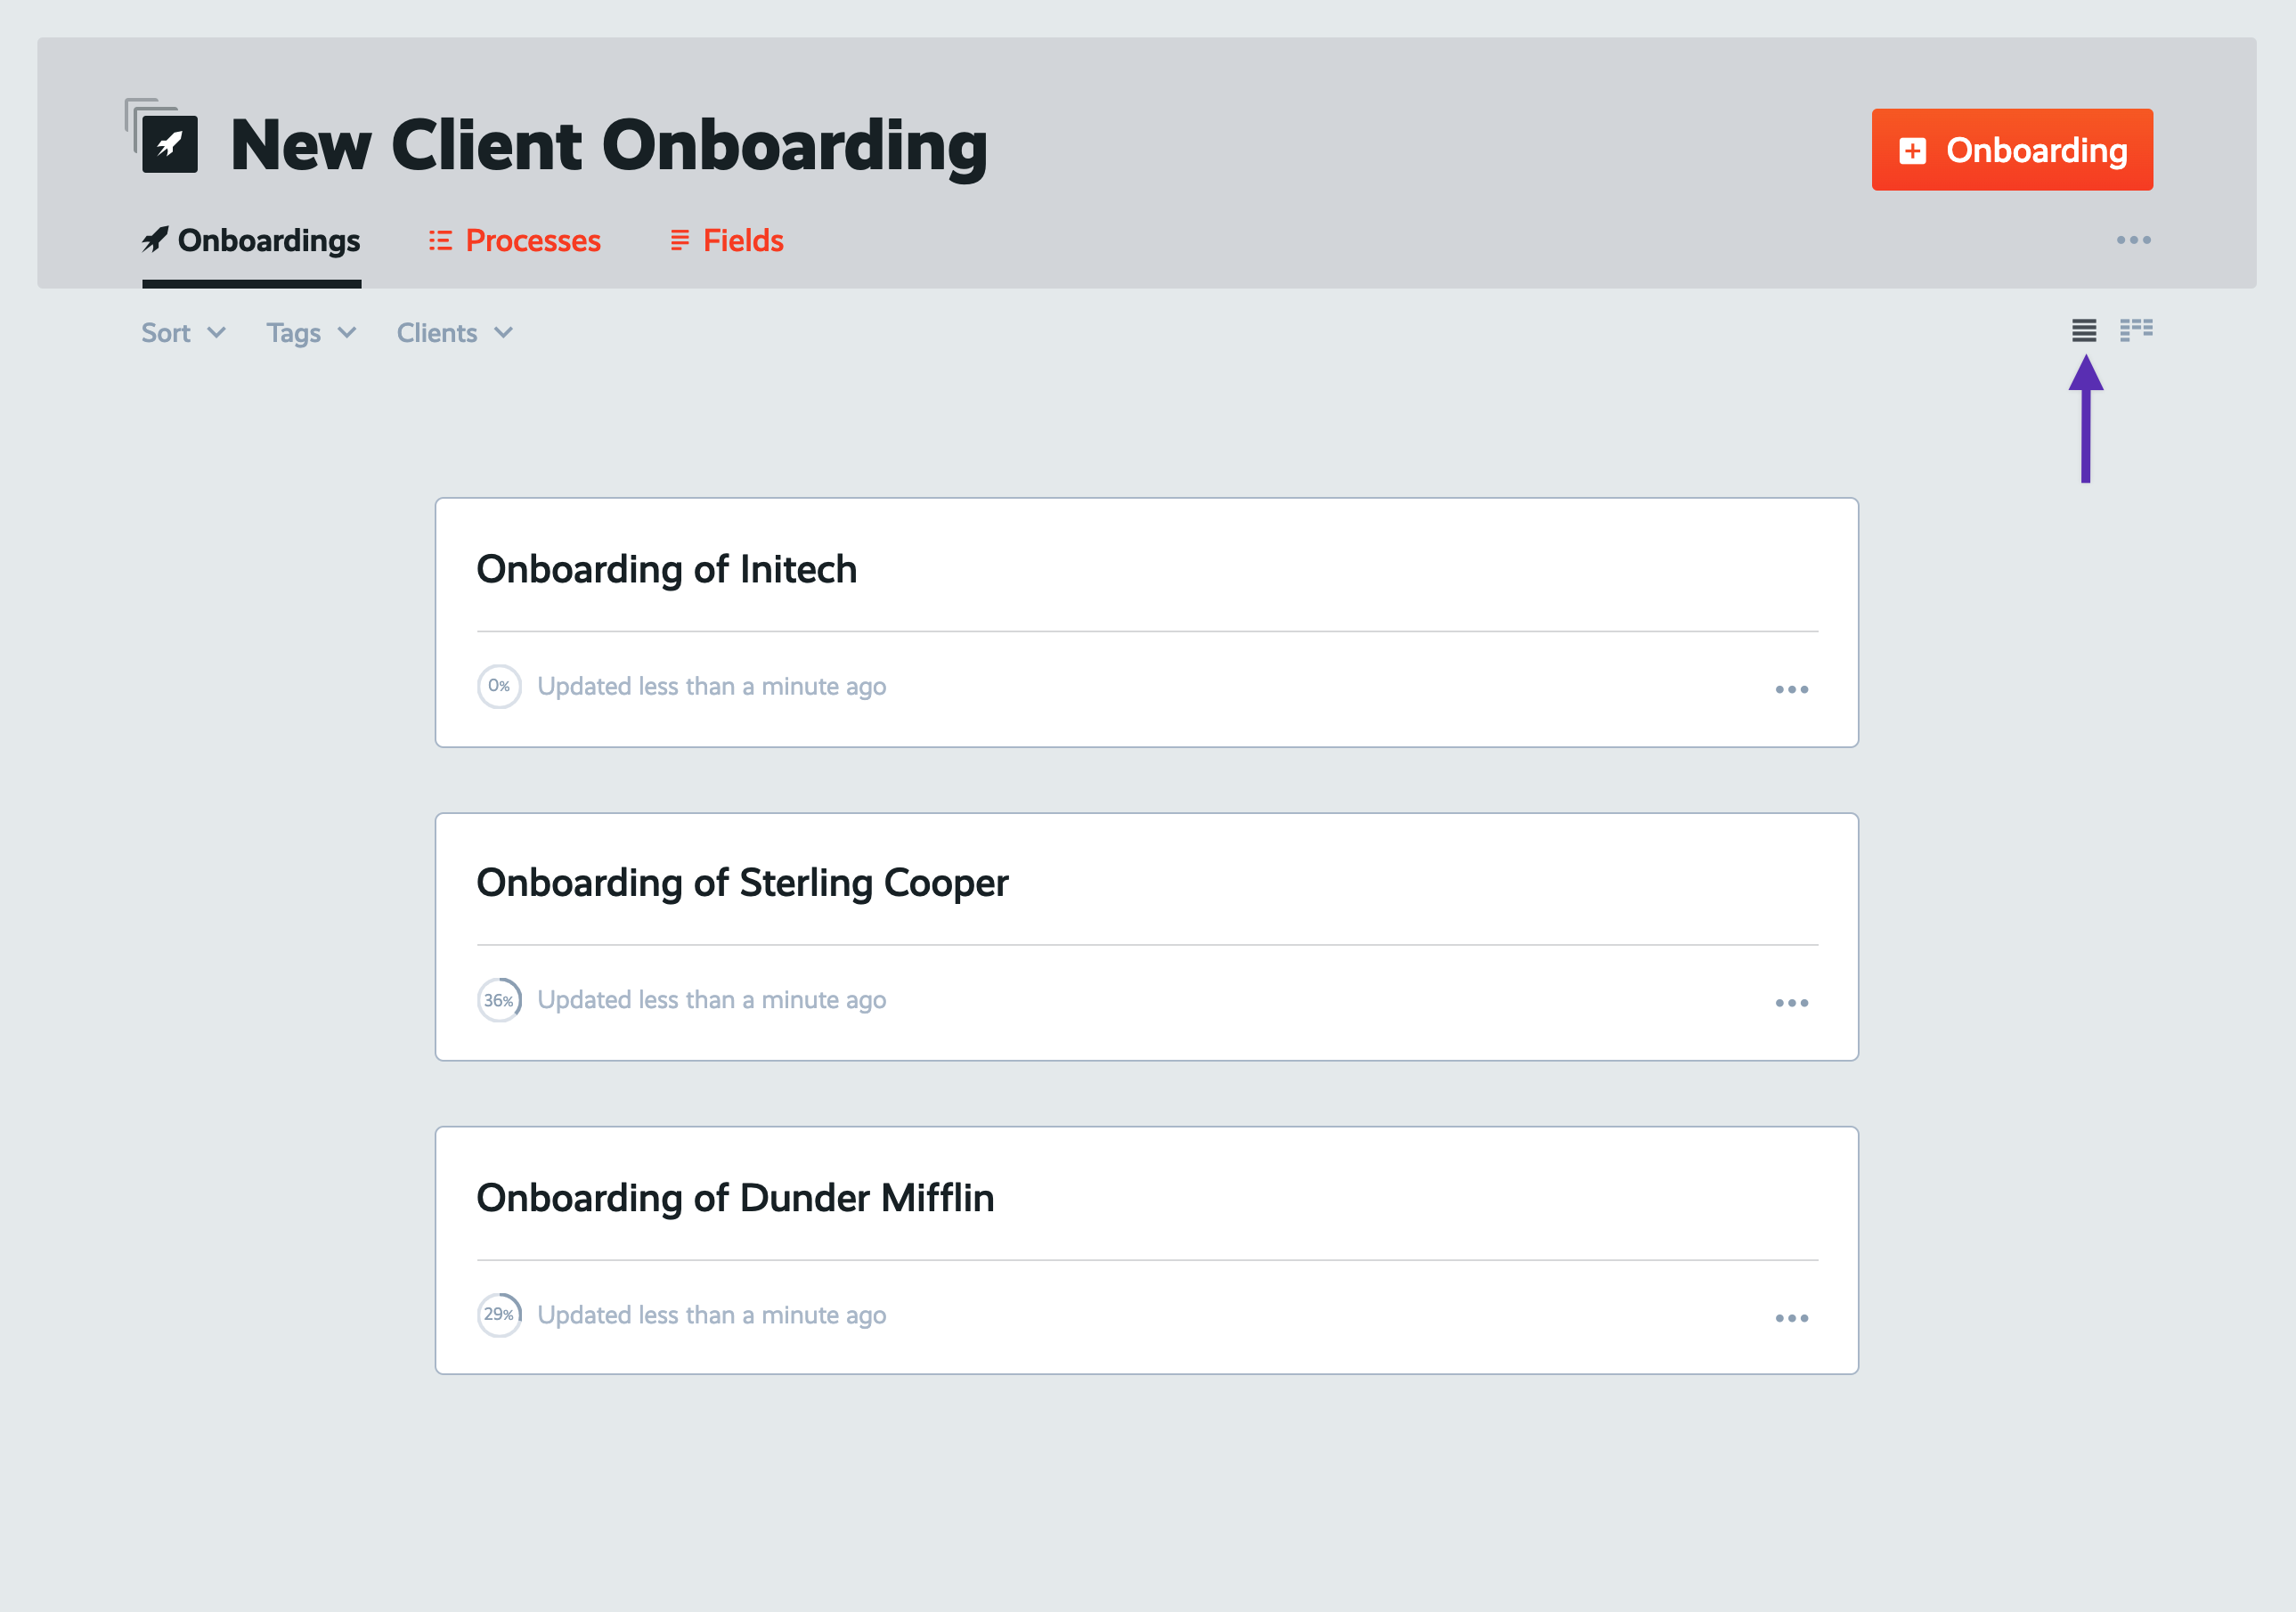
Let's take a look at the "New Client Onboarding" board now. When you view a board for the first time, it defaults to viewing all of the projects inside it in list mode. When viewing in list mode, you can sort and filter your list of projects.
Here's what your "New Client Onboarding" board looks like when list mode is in view:
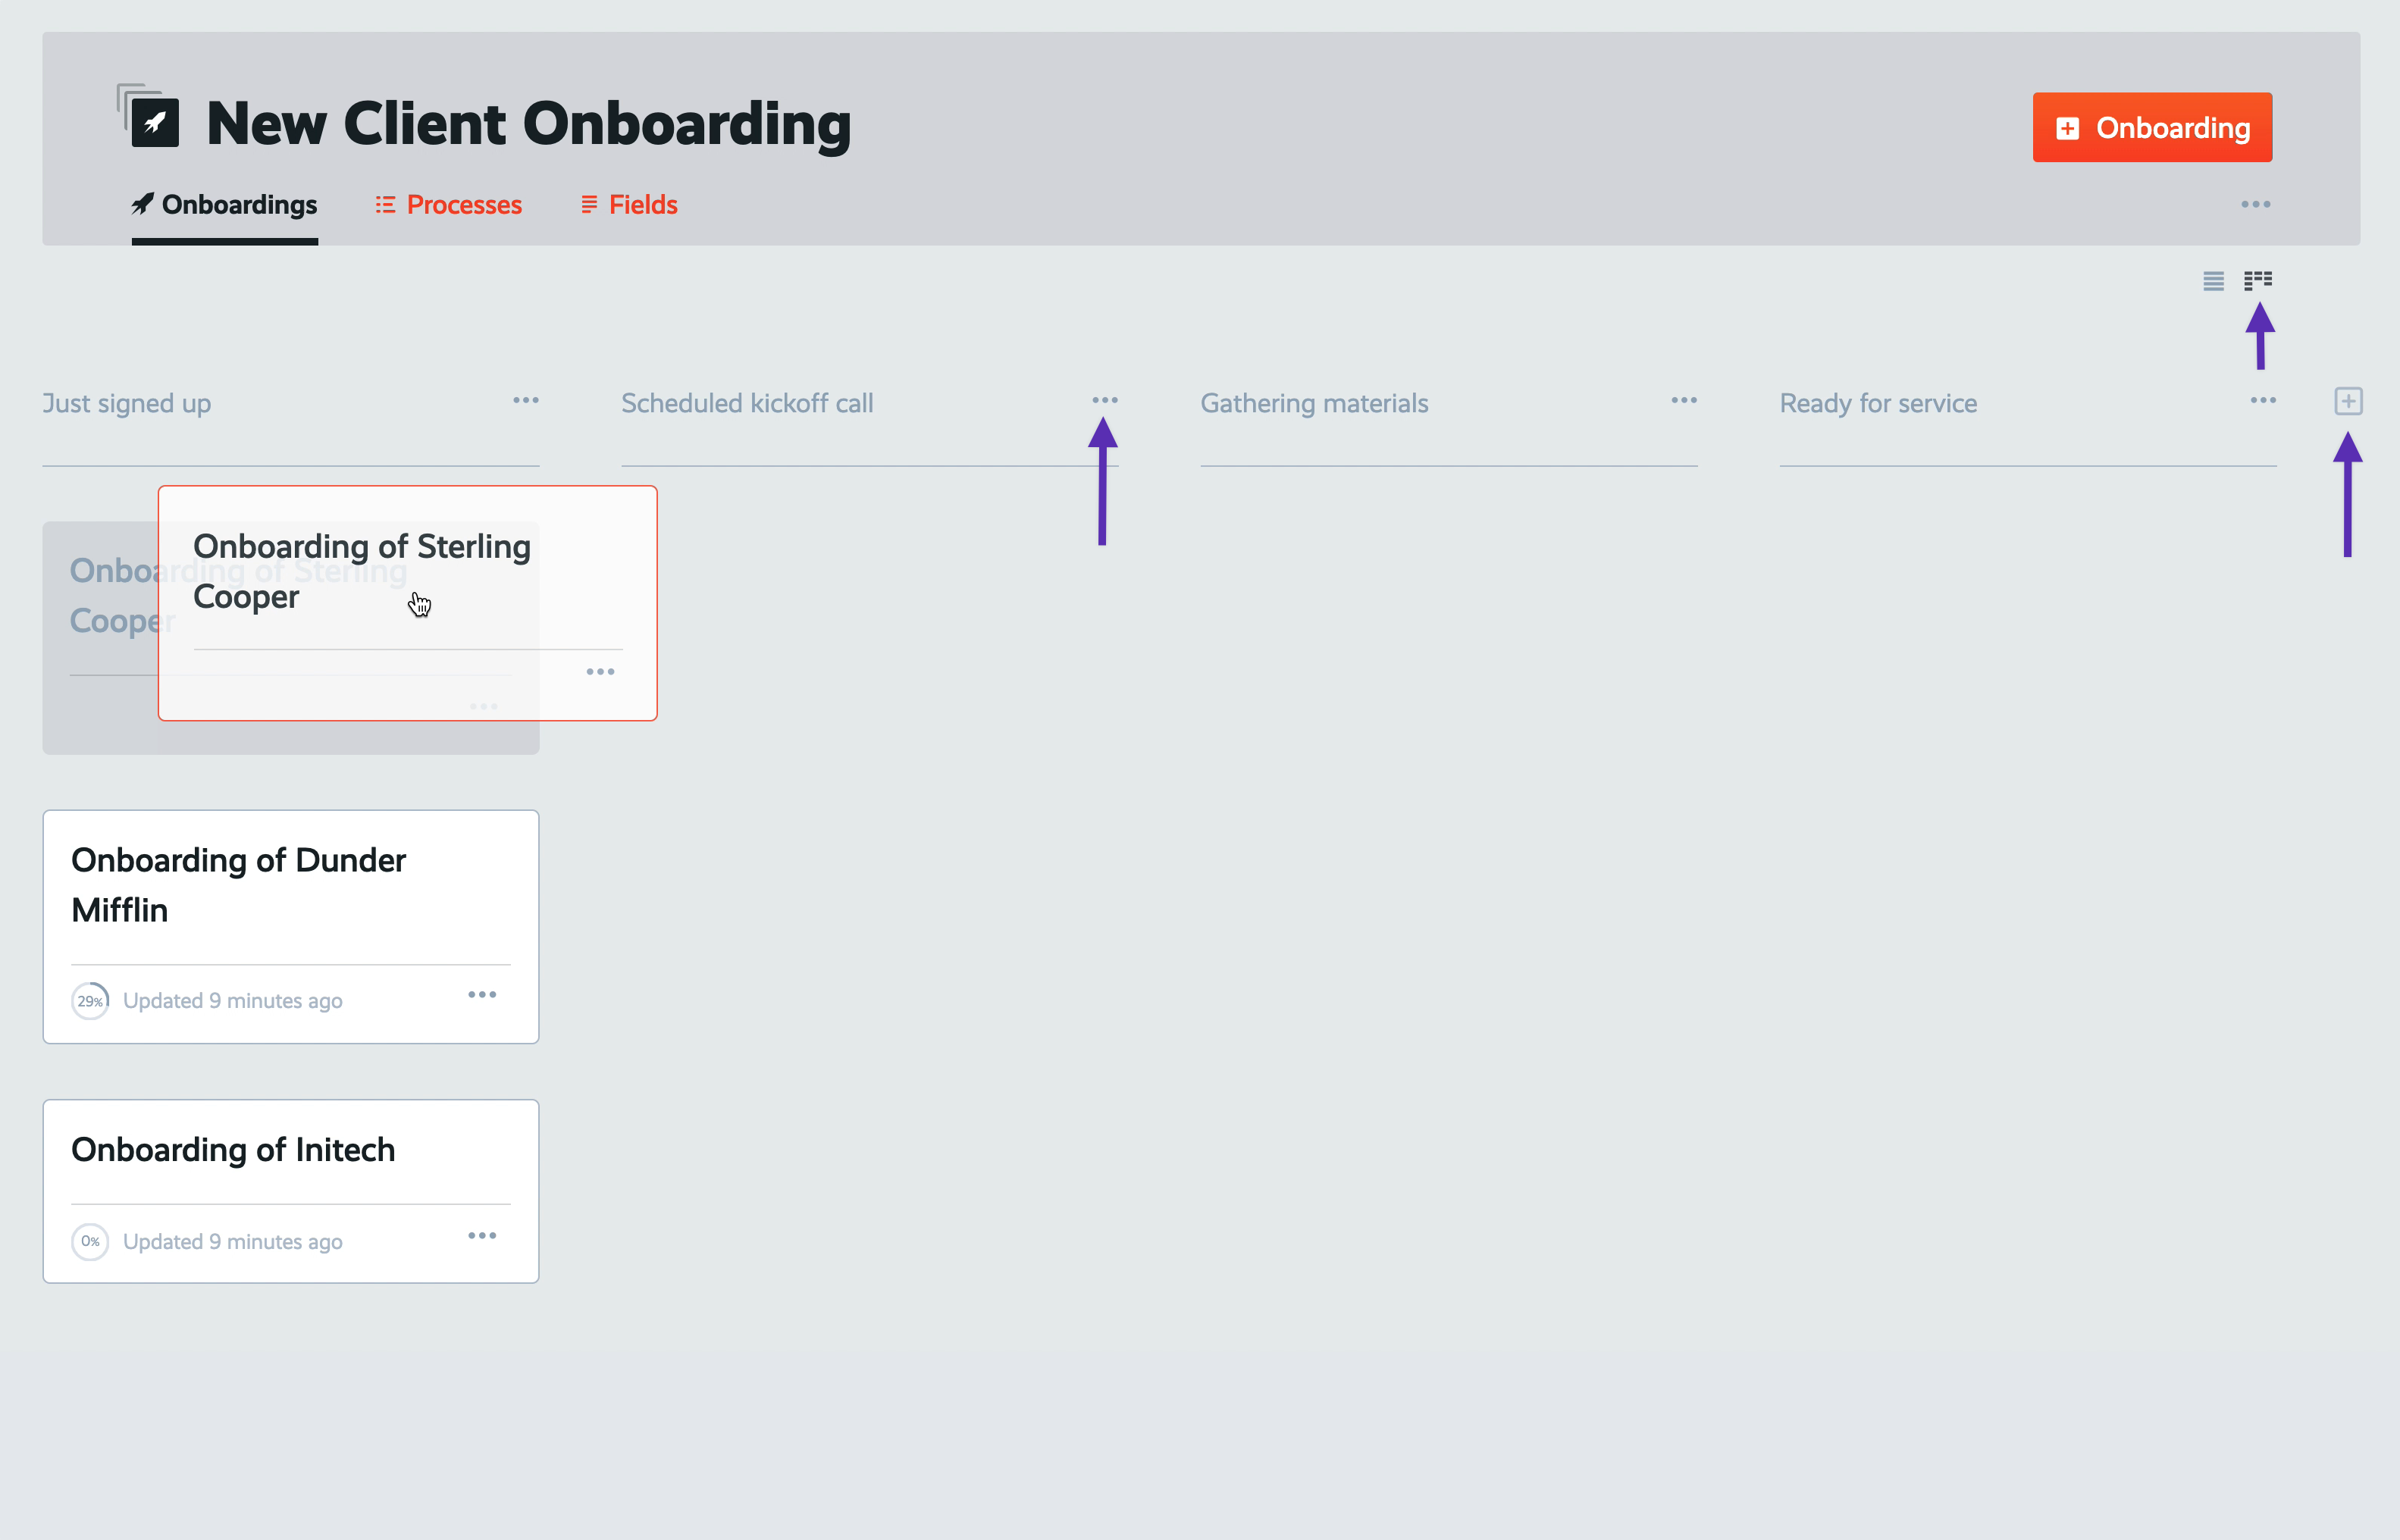
Now switch over to Kanban mode by clicking that icon. Kanban mode organizes your board into multiple lists. By default, it starts with 3 lists called "Incoming", "In progress" and "Complete".
Let's customize these lists by renaming them and adding a 4th list, so that our 4 Kanban lists in our "New Client Onboarding" board are: "Just signed up", "Scheduled kickoff call", "Completed kickoff call", "Ready for service".
Bonus: Store key information using custom fields
A little outside the scope of this course, but I wanted to give you a bonus tip that I think you'll find really useful:
You can create custom fields to store key information on your projects. There are all sorts of field types you can create, like text inputs, rich text fields, select dropdowns, website addresses, email addresses, and more.
And just like pre-loading processes on a board, you can pre-load fields on a board as well. Meaning, every project that gets created inside a board can get your custom fields added to it as well.
These fields will come in handy later when you need to store project-specific information. You can even automatically send values to these fields using the Zapier integrations, which we'll get into later in this course.
Check out our documentation on how custom fields work in ProcessKit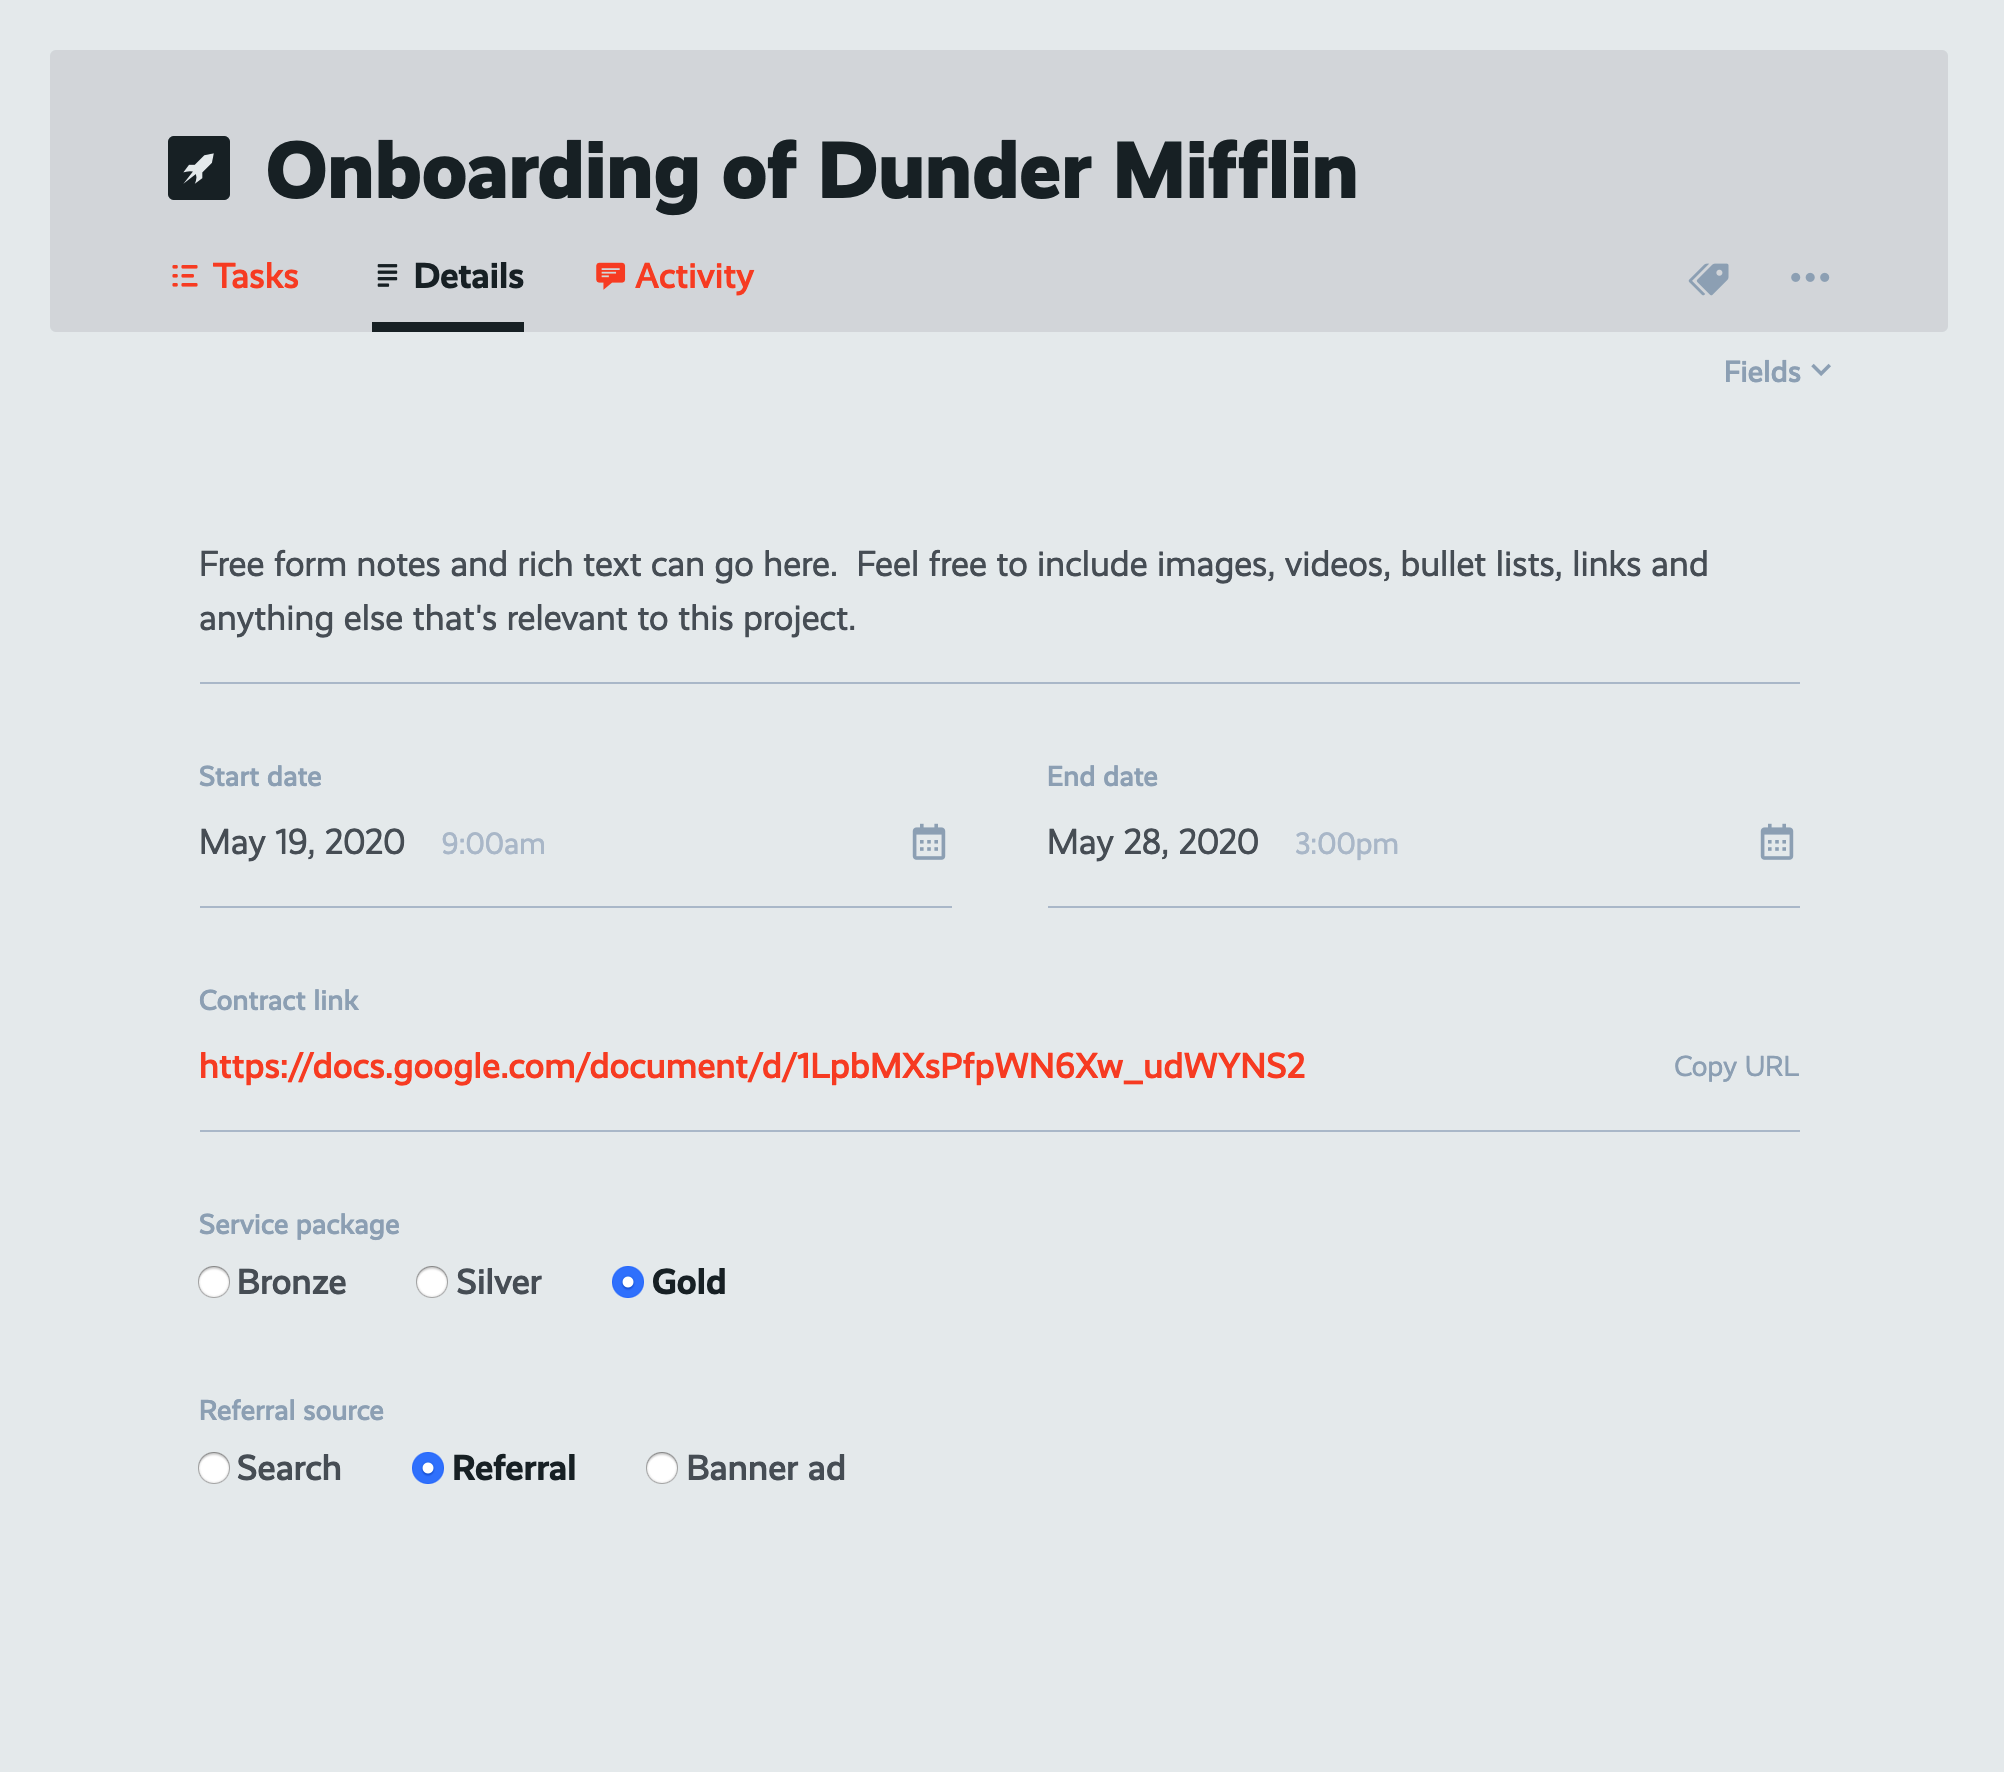
Viewing a project's "Details" view, where custom fields can be stored.
In the next lesson...
We're taking your process automation up a notch: I'll show you how to create dynamic date rules in your processes so that your task's can automatically calculate their due dates, and auto-adjust to changes on the fly.
Have questions? Need help or advice on mapping out your processes in the right way? I love talking process! Get in touch and I'll be happy to work with you in your ProcessKit account.
Haven't started using your ProcessKit yet? Start your free trial.